 |
Beyond Code: An Introduction to Model-Driven Software Development (CISC 844, Winter 2025)
Assignment 1 (MDSD with HCL Model RealTime)Due:
|
- Purpose of the Assignment:
To help you get some first practical experience with- structural and behavioural modeling in UML-RT, and
- model-driven development using HCL Model RealTime
- Preparation:
- Individual assignment: Note that this is an individual assignment. That is, each student must prepare and submit his/her own solution. All work submitted must be your own. Queen's Arts and Science regulations on Academic Integrity are in effect and will be enforced, https://www.queensu.ca/artsci/students-at-queens/academic-integrity
- Obtaining and installing HCL Model RealTime (M-RT): You need to install M-RT for this assignment. You can find the download and installation instructions here. The site is protected. Username and password will be provided in class. To obtain the licence key, please send an email to the instructor.
- Use Discourse and the MS Teams chat for questions: Note that questions about the tool and the assignment (e.g., the assignment descriptions, what the model to be created is supposed to do, etc) should go to the Assignment 1 discussion forum on discourse.caslab.queensu.ca (if you have signed up and registered for this course, you should see 'CISC 844' as one of your courses, once you have logged in) or, for smaller questions that require only a short response, to the CISC844 group chat on Teams.
- Download and import a model that you will have to complete: Download the zip file Safe_v0.zip into some directory. The file contains a project (called Safe_v0) with a partial model that you have to complete in this assignment. To import the project into your M-RT workspace, click 'File', select 'Import...', and then 'Existing Projects into Workspace'; set the 'Select archive file' radio button, click 'Browse', navigate to the directory that you stored the zip file in, select it, click 'Open', and then 'Finish'.
- Instructions on how to copy/paste projects: As in traditional
development, it can be very useful to create a copy of a
project, before you make a bigger change: if things don't
work out and you get stuck, you can always go back to the
previous version. Here is how to create a copy of a project
in M-RT:
- Copy/paste and change project name: In the project explorer, right-click the project to be copied and select 'Copy'. Then, right-click that same project, select 'Paste', and update the project name as appropriate.
- Rename model package: Now, some names and settings need to be updated in the new project. Open the new project, then the 'Models' folder, and then the model package. Right-click the model package (it will have the old name), select 'Refactor', and then 'Rename', and update the name as appropriate.
- Update transformation configuration: In the new project, open 'Transformation Configurations' and then the default transformation configuration (or whatever the transformation configuration was called in the copied project). To make the configuration work for the new project, go to the 'Main' tab and under 'Sources', remove the old model package and then add the new model package (click 'Add' and then navigate to the package in the new project). Still in the 'Main' tab, under 'Target' update the 'Workspace output path' as appropriate. In the 'Code Generation' tab, under 'Top capsule', remove the old top capsule by clicking 'Clear'. Then click 'Select...', navigate to and select the top capsule in the new project, and click 'Ok'. Finally, make sure that you save the updated transformation configuration.
- Context:
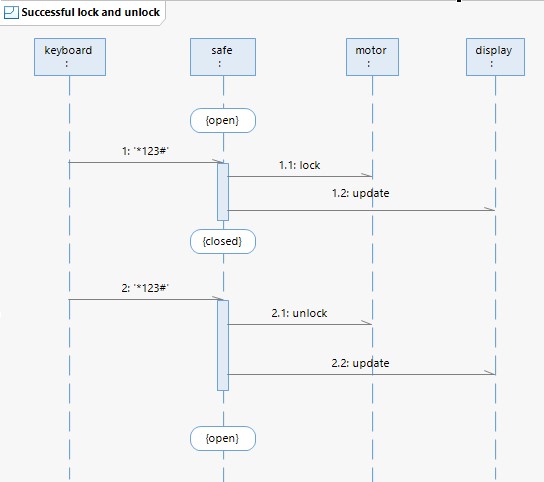
You have been hired as software tester for the MSC safe company. On your first day, you download theSafe_v0project containing a partial UML-RT model for a simple hotel safe. The safe can be locked by entering a 3-digit code (preceeded by a '*' and followed by a '#'), and unlocked by entering the same 3-digit code that was used to lock it (again, preceeded by a '*' and followed by a '#'). Relevant information is shown to the user on a display. Below, an image of the user interface is shown together with a sequence diagram illustrating its successful use to lock and unlock the safe using the code '123'.
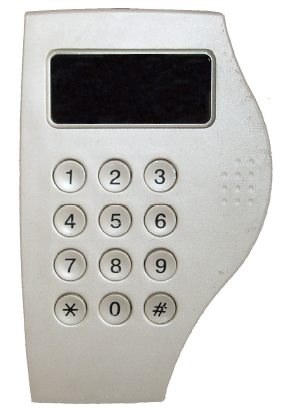
A larger image of the interface together with operating instructions can be found here.
The top capsule of theSafe_v0project contains a capsuleSafethat implements the control logic of the safe, as well as a capsuleHarnessused for testing. The structure of the project is shown below using a UML class diagram (left) and a UML structured classifier diagram (right), also called 'capsule diagram' in UML-RT.
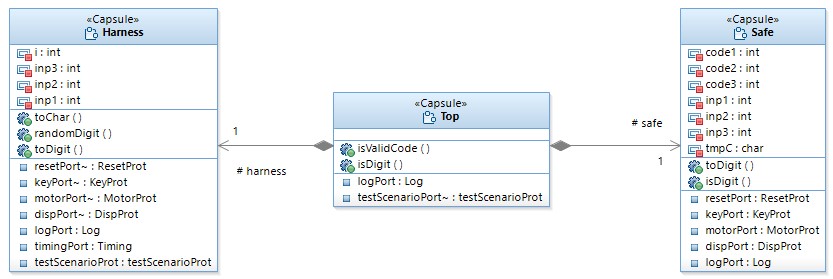
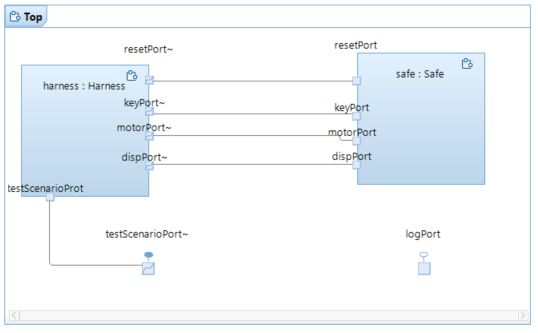
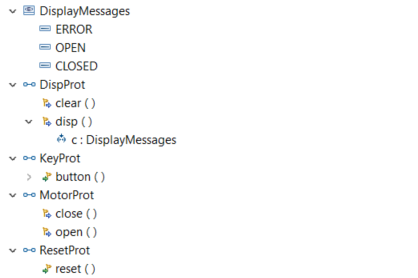
There are four connectors between the harness and the safe. On the side of the safe, the ports of these connectors are calledkeyPort,motorPort,displayPort, andresetPort. These ports are base ports and typed over the following four protocols respectively:KeyProt: Contains incoming messagebutton(c:char)representing button pushes. The argument contains value of button pushed.MotorProt: Contains two outgoing messagesopen()andclose()which the safe sends to the motor to open and close the safe, respectively.DisplayProt: Contains two outgoing messagesdisp(c:DisplayMessages)andclear()which the safe sends to the display to display a message and to clear the display, respectively. The three messages that can be displayed areERROR,OPEN, andCLOSED.ResetProt: Contains one incoming messagereset()which causes the safe to return to a state in which it is open and ready to receive code sequences.
DisplayMessagesenumeration type appear in M-RT.
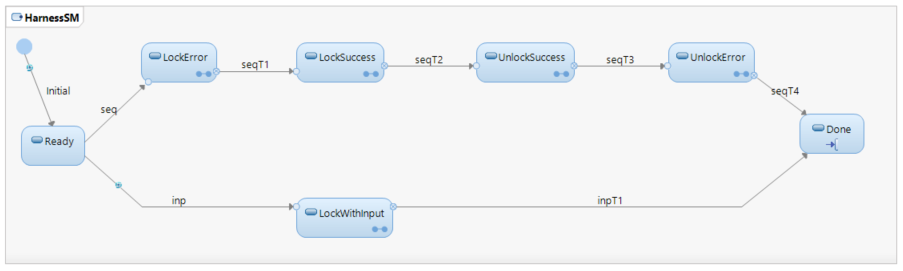
The harness provides input to the safe via portskeyPortandresetPort, and receives the safe's output via portsmotorPortanddispPort. The harness also has atestScenarioPorton which it receives command line arguments indicating different test scenarios from the containing capsuleTop. The state machine of the harness currently only supports two scenarios:- 'sequence': 4 different test phases (implemented by composite
states
LockError,LockSuccess,UnlockSucess, andUnlockError, respectively) are being executed on the safe in a sequence. Each phase consists of a sequence of test cases, and tests different aspects of the expected behaviour. For instance, phaseLockErrorcontains 4 test cases that test if the safe behaves correctly in response to incorrect or incomplete attempts to lock it (e.g., code consists of less/more than 3 digits, or is not surrounded by '*' and '#' inputs); in all these cases, the safe should display an error message temporarily and stay unlocked. In phaseUnlockErrorthe safe is first locked and then exposed to incorrect or incomplete attempts to unlock it. Similarly,LockSuccessandUnlockSuccesstests the safe responds correctly to correct and complete inputs.
This scenario is executed when the code generated from the project is invoked with theseq(or justs) command line option:>> ./safe.exe -URTS_DEBUG=quit -UARGS seq - 'input code': The safe is locked with a code provided by the user
from the command line.
This scenario is implemented by composite stateLockWithInputand executed when the command line option that the generated code is invoked with consists of a 3-digit number: e.g.,>> ./safe.exe -URTS_DEBUG=quit -UARGS 123.
Harnessstate machine:
- Task Description:
Your manager at MSC has asked you to carry out the tasks described in the four parts below. For each part, you can make the changes on the same project, i.e., there is no need to create separate copies.- Part 1 [2 points] Use M-RT to draw a sequence diagram of the
sequence of messages that are exchanged between the harness and the safe
during the execution of last test case in state
LockError. To create the diagram, right-click on the model folder ('Safe_v0_Model'), then select 'Add Digram' and 'Sequence Diagram'. To add lifeline, select and drag a 'Lifeline' into the canvas ('Interaction1'), then choose 'Unspecified', then name the lifeline appropriately. To create a message, select 'Asynchronous Message' in palette, then click on source and then the target lifeline. Name message as appropriate. - Part 2 [8 points] The four test phases that make up the sequence scenario
are not
particularly comprehensive. Add an appropriate test case to each of
the four test phases. Ensure that your new test case is focussed and consistent
with the purpose of the phase you add the test to. E.g., the new test case that you add
to phase
LockErrorshould test that the safe behaves correctly in response to an incomplete or incorrect attempt to lock it and nothing else. Describe each of these four new test cases very briefly in a text file called 'ReadMe.txt' that is part of your project (Safe_v0unless you have renamed it). Instructions to create this text file: In 'Project Explorer', right click on your project, select 'New'->'File', type 'ReadMe.txt' in the 'File name' text field, and click 'Finish'. - Part 3 [4 points] Currently, the test phases are executed in the
following order:
LockError,LockSuccess,UnlockSucess, andUnlockError. If this order is changed, it is possible that the testing process fails. Determine what causes these failures and come up with asimple fix, so that the phases can be used in any order. Describe the fix very briefly in the same 'ReadMe.txt' file used for Part 2, and also implement it. - Part 4 [8 points] Implement a new, third test scenario called 'random'
in which
the harness generates a random 3-digit code and uses it to lock the safe.
To invoke this scenario, the command line option
rand(or justr) should be used. Hint: The capsuleHarnesscontains two operationsrandomDigit():intandtoChar(i:int):charwhich you may find helpful. - Part 5 In this part, two of the above scenarios will be modified.
- [16 points]
Implement a composite state
Crackingwhich assumes that the safe is locked and in which the harness tries to unlock the safe using all valid 3-digit codes. More precisely,Crackingshould allow the harness to systematically try all valid 3-digit codes until either the safe is opened, or all valid 3-digit codes have been tried. - [2 points]
Modify the 'input code' scenario so that after
the safe has been locked with the user-provided code,
the safe is opened again by activating
Cracking. - [2 points]
Modify the 'random' scenario so that after the
safe has been locked with a random code, the safe
is openend using
Cracking.
- [16 points]
Implement a composite state
- Part 6 [0 points] A voice-activated (in Arabic) version of the safe using web services for speech processing and the Unity 3D game engine for simulation can is shown in this YouTube video.
- Part 7 [0 points] Become a better user of hotel safes by watching this YouTube video and also reading this web page.
For Parts 1 through 4 above, ensure that whenever a message is sent to a capsule, then the state machine of the capsule is in a state in which the receipt of the message triggers a transition. In other words, neither the harness nor the safe should ever report an 'Unexpected Message' during execution. Also, do not use loops in action code, i.e., all action code should be free offor,while, andrepeatstatements.
- Part 1 [2 points] Use M-RT to draw a sequence diagram of the
sequence of messages that are exchanged between the harness and the safe
during the execution of last test case in state
- What to submit using OnQ:
- When you are done, export the project containing the model for all
four parts into a single archive (.zip file).
Instructions: 'File' -> 'Export...' -> 'General' ->
'Archive File' -> 'Next', then, on the left, select the project containing your
modified models (inclusion of the project containing the generated code is not necessary).
Make sure that on the right, all elements are selected (e.g., '.project', 'ReadMe.txt').
Under 'To archive file', use
[firstName]_[lastName]_A1_CISC844_W25.zipas name where[firstName]and[lastName]are replaced by your first and last names, respectively. Click 'Finish'. Upload this archive to OnQ.
- When you are done, export the project containing the model for all
four parts into a single archive (.zip file).
Instructions: 'File' -> 'Export...' -> 'General' ->
'Archive File' -> 'Next', then, on the left, select the project containing your
modified models (inclusion of the project containing the generated code is not necessary).
Make sure that on the right, all elements are selected (e.g., '.project', 'ReadMe.txt').
Under 'To archive file', use
- Marking:
Your models will be marked based on their correctness and completeness (with respect to the assignment instructions and the system descripion), but also using the design guidelines discussed in class. You can find a summary of these guidelines on slides 68 to 70 of the UML-RT slide deck used in class, http://research.cs.queensu.ca/~dingel/cisc844_W25/slides/UML_RT_W25_Parts1To3_4up.pdf.
Last modified: Sun Jan 05 2025 12:07:08