Queen's Logo

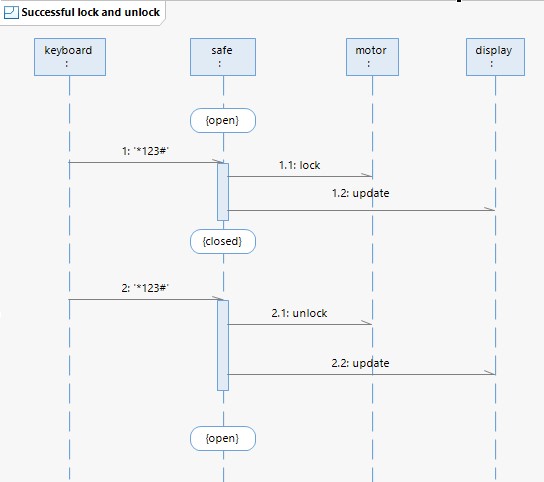
Beyond Code: An Introduction to Model-Driven Software Development (CISC 836, Fall 2021)

Assignment 1 (MDSD with IBM RSARTE)

Due: Sun, Oct 10

  1. Purpose of the Assignment:
    To help you get some first practical experience with
  2. Preparation:
    1. Individual assignment: Note that this is an individual assignment. That is, each student must prepare and submit his/her own solution. All work submitted must be your own. Queen's Arts and Science regulations on Academic Integrity are in effect and will be enforced, https://www.queensu.ca/artsci/students-at-queens/academic-integrity
    2. Obtaining and installing RSARTE: You need to install RSARTE for this assignment. You can find the download and installation instructions here. The site is protected. Username and password will be provided in class. To obtain the licence key, please send an email to the instructor.
    3. Use OnQ and the MS Teams chat for questions: Note that questions about the tool and the assignment (e.g., the assignment descriptions, what the model to be created is supposed to do, etc) should go to the Assignment 1 discussion forum on onq.queensu.ca (if you have signed up and registered for this course, you should see 'CISC 836' as one of your courses, once you have logged in) or, for smaller questions that require only a short response, to the CISC836 group chat on Teams.
    4. Download and import a model that you will have to complete: Download the zip file Safe_v0.zip into some directory. The file contains a project (called Safe_v0) with a partial model that you have to complete in this assignment. To import the project into your RSARTE workspace, click 'File', select 'Import...', and then 'Existing Projects into Workspace'; set the 'Select archive file' radio button, click 'Browse', navigate to the directory that you stored the zip file in, select it, click 'Open', and then 'Finish'.
    5. Instructions on how to copy/paste projects: As in traditional development, it can be very useful to create a copy of a project, before you make a bigger change: if things don't work out and you get stuck, you can always go back to the previous version. Here is how to create a copy of a project in RSARTE:
      1. Copy/paste and change project name: In the project explorer, right-click the project to be copied and select 'Copy'. Then, right-click that same project, select 'Paste', and update the project name as appropriate.
      2. Rename model package: Now, some names and settings need to be updated in the new project. Open the new project, then the 'Models' folder, and then the model package. Right-click the model package (it will have the old name), select 'Refactor', and then 'Rename', and update the name as appropriate.
      3. Update transformation configuration: In the new project, open 'Transformation Configurations' and then the default transformation configuration (or whatever the transformation configuration was called in the copied project). To make the configuration work for the new project, go to the 'Main' tab and under 'Sources', remove the old model package and then add the new model package (click 'Add' and then navigate to the package in the new project). Still in the 'Main' tab, under 'Target' update the 'Workspace output path' as appropriate. In the 'Code Generation' tab, under 'Top capsule', remove the old top capsule by clicking 'Clear'. Then click 'Select...', navigate to and select the top capsule in the new project, and click 'Ok'. Finally, make sure that you save the updated transformation configuration.

  3. Context:
    You have been hired as software tester for the MSC safe company. On your first day, you download the 'Safe_v0' project containing a partial UML-RT model for a simple hotel safe. The safe can be locked by entering a 3-digit code (preceeded by a '*' and followed by a '#'), and unlocked by entering the same 3-digit code that was used to lock it (again, preceeded by a '*' and followed by a '#'). Relevant information is shown to the user on a display. Below, an image of the user interface is shown together with a sequence diagram illustrating its successful use to lock and unlock the safe using the code '123'.

    A larger image of the interface together with operating instructions can be found here.
    The top capsule of the 'Safe_v0' project contains a capsule 'Safe' that implements the control logic of the safe, as well as a capsule 'Harness' used for testing. The structure of the project is shown below using a UML class diagram (left) and a UML structured classifier diagram (right), also called 'capsule diagram' in UML-RT.

    There are four connectors between the harness and the safe. On the side of the safe, the ports of these connectors are called 'keyPort', 'motorPort', 'displayPort', and 'resetPort'. These ports are base ports and typed over the following four protocols respectively:
    1. 'KeyProt': Contains incoming message 'button(c:char)' representing button pushes. The argument contains value of button pushed.
    2. 'MotorProt': Contains two outgoing messages 'open()' and 'close()' which the safe sends to the motor to open and close the safe, respectively.
    3. 'DisplayProt': Contains two outgoing messages 'disp(c:DisplayMessages)' and 'clear()' which the safe sends to the display to display a message and to clear the display, respectively. The three messages that can be displayed are 'ERROR', 'OPEN', and 'CLOSED'.
    4. 'ResetProt': Contains one incoming message 'reset()' which causes the safe to return to a state in which it is open and ready to receive code sequences.
    Below is a screenshot of how these protocols and the 'DisplayMessages' enumeration type appear in RSARTE.

    The harness provides input to the safe via ports 'keyPort' and 'resetPort', and receives the safe's output via ports 'motorPort' and 'dispPort'. The harness also has a 'testScenarioPort' on which it receives command line arguments indicating different test scenarios from the containing capsule 'Top'. The state machine of the harness currently only supports two scenarios:
    1. 'sequence': 4 different test phases (implemented by composite states 'LockError', 'LockSuccess', 'UnlockSucess', and 'UnlockError', respectively) are being executed on the safe in a sequence. Each phase consists of a sequence of test cases, and tests different aspects of the expected behaviour. For instance, phase 'LockError' contains 4 test cases that test if the safe behaves correctly in response to incorrect or incomplete attempts to lock it (e.g., code consists of less/more than 3 digits, or is not surrounded by '*' and '#' inputs); in all these cases, the safe should display an error message temporarily and stay unlocked. In phase 'UnlockError' the safe is first locked and then exposed to incorrect or incomplete attempts to unlock it. Similarly, 'LockSuccess' and 'UnlockSuccess' tests the safe responds correctly to correct and complete inputs.
      This scenario is executed when the code generated from the project is invoked with the 'seq' (or just 's') command line option: '>> ./safe.exe -URTS_DEBUG=quit -UARGS seq'
    2. 'input code': The safe is locked with a code provided by the user from the command line.
      This scenario is implemented by composite state 'LockWithInput' and executed when the command line option that the generated code is invoked with consists of a 3-digit number: e.g., '>> ./safe.exe -URTS_DEBUG=quit -UARGS 123'.
    Below is an image of the 'Harness' state machine:
  4. Task Description:
    Your manager at MSC has asked you to carry out the tasks described in the four parts below. For each part, you can make the changes on the same project, i.e., there is no need to create separate copies. For Parts 1 through 4 above, ensure that whenever a message is sent to a capsule, then the state machine of the capsule is in a state in which the receipt of the message triggers a transition. In other words, neither the harness nor the safe should ever report an 'Unexpected Message' during execution. Also, do not use loops in action code, i.e., all action code should be free of 'for', 'while', and 'repeat' statements.

  5. What to submit using OnQ:

  6. Marking:
    Your models will be marked based on their correctness and completeness (with respect to the assignment instructions and the system descripion), but also using the design guidelines discussed in class. You can find a summary of these guidelines on slides 68 to 70 of the UML-RT slide deck used in class, http://research.cs.queensu.ca/~dingel/cisc836_F21/slides/UML_RT_F21_Parts1To3_4up.pdf.